
Windows Server 2022 Active Directory Home Lab Part 4: NTP and SSH.
Boy would you look at the time! NTP is used to control and sync time to clients. It will be set up on our domain controller, and its surprisingly easy to setup. In fact, its so easy, Windows may have automatically set it up during our installation. Windows Server 2022 for the time service is built in and is known as “W32Time.” We won’t find this anywhere in the Server Manger however. To confirm if our Domain Controller is setup as an NTP server, just open powershell by typing it in the searchbar, run it as administrator by right clicking on powershell, if a prompt shows up, click yes, then type: “w32tm /query /status.” In the resulting output, if you see the Stratum value as a 1, then there isn’t that much left to do. If, however, you don’t, then to set it up, we actually have to go into the Registry editor (one of the few time we actually do this). Just a reminder, if you are new to setting up Active Directory, you shouldn’t visit the Registry Editor unless you are absolutely sure you know what you are doing. Anyway to get the Stratum to 1 in the Registry editor, expand the file under “HKEY_LOCAL_MACHINE” then expand the file under “SYSTEM” then expand the file under “CurrentControlSet,” then expand the file under “Services.” Look for “W32time” and then expand that file, then expand the file “TimeProviders,” then click “NTPServer.” If done correctly, you should arrive at a place that looks like this:
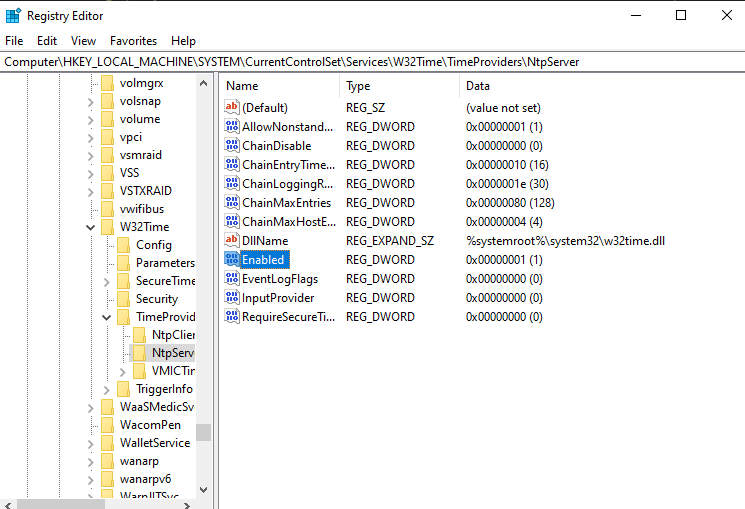
Click on the “enabled” field (highlighted in the picture above), and where the upcoming window says “Value Data”, type in a 1, and we are halfway done. Now all we have to do is ensure that the firewall doesn’t block port 123, to do this, go back to the Administrator PowerShell, and enter the following command: “netsh advfirewall firewall add rule name=”NTP Server” dir=in action=allow protocol=UDP localport123“; this command allows NTP to go through the firewall. Also type in: “w32tm /config /reliable:yes /update“; this command basically lets clients syncing to this server know if this NTP server is reliable or not. After thats all said and done, type in “net stop w32time” and “net start w32time” to restart the NTP service, and that’s it. The NTP server is officially set up. All that’s left is to connect clients to it, but before doing that, on the topic of connections, any connection a computer makes to transfer information should be secured. An easy way of doing this is SSH; remember, do not use telnet in real production networks as it is unsecure. It’s also not recommended to do this on a Domain Controller like I will demonstrate due to concerns of the attack surface should it be compromised, but this is a lab, so for the sake of brevity, thats why I will not set up an additional server.
Using the same powershell window we used to run NTP through the firewall, type “Add-WindowsCapability -Online -Name OpenSSH.Server~~~~0.0.1.0.” This will install OpenSSH, an excellent tool to use that’s free to use and is open source. To make it automatically run and start it just type “Start-Service sshd” hit enter, then type the following: “Set-Service -Name sshd -StartupType ‘Automatic’.” You may also need to run this service through the firewall. To do this type “New-NetFirewallRule -Name sshd -DisplayName ‘OpenSSH Server (sshd)’ -Enabled True -Direction Inbound -Protocol TCP -Action Allow -LocalPort 22.” After that, have any (or every) client test to see if this works by entering in the command prompt or PowerShell: “ssh username@YourServerIP” with “username” being the name of the domain user connected to the domain controller, and “YourServerIP” being the SSH server IP address. Once connected, that’s it, both SSH and NTP have been setup, however, it is also reccommended to set up Key Based authentication for Security purposes. To do that for a user, just type “ssh-keygen”, and whatever the public key is (should be known as id_rsa.pub, or something like that) put the public key in the authorized key folder which should be inside wherever the ssh folder is, and put the private key somewhere safe, and then your machine is instantly that more secure.
In part 5, we will go over setting up a storage server.
Filed under: Labs,Professional Development - @ September 27, 2025 10:47 am